Welcome to the Crown Vics ETC blog!

On April 6, 2000, I purchased a 1998 Ford Crown Victoria LX HPP with 23,490 miles. I decided to start a little website for it featuring a running log of my experiences with the car. Vic 1.0 was retired in 2015 due to rust and electrical issues. Vic 2.0 was a 2006 P71 in Blue Pearl that belonged to my boyfriend. It was a Ford demo and never saw actual police use. It was damaged in September of 2018 with well over 186,000 miles. It was replaced by Vic 3.0 in October 2018, a 2008 P71 in Silver Birch with 120,971 miles. To read posts prior to 2010, click a link at right, or go to Crown Vics, ETC.

Showing posts with label change. Show all posts

Sunday, September 17, 2023

HOW TO Change a Crown Victoria Grille

SO after installing nice new headlights in Vic 3.0, I decided to bite the bullet and also install the NOS grille I had been sitting on for MANY years.  

This is a simple install.  All you need to do is remove the black plastic filler panel/radiator cover, then use a socket (I forgot to note the size for you, I THINK they are 7/16") and remove the retaining nuts all around the back of the grille.  Swap grilles, and put the nuts back... simple!  But don't overtighten them... don't want to snap the posts!

Now is a good time to touch up the paint around the grille... you KNOW you need to!

Old on bottom... note the corrosion on the chrome

Looks like a new car!  Now that license plate holder needs to be changed...


HOW TO Change Crown Victoria Headlights

I am way behind with updates, so to catch up a bit, here's a quick rundown of how to swap your crummy, cloudy old headlights with nice, clear, shiny new ones.  A while back, I had scored a brand new original Ford and one super nice used example, and last year decided to install them and stop worrying that I'd be inviting some sort of smash-up simply by them being there (would be my luck, just like every single time I get brand new tires, I get nails and screws stuck in them!).

STEP ONE:  Open the hood, and remove the black plastic filler panel/radiator cover

STEP TWO:  Take a tool that you are comfortable with and slide these two retaining brackets UP to free the headlight


STEP THREE:  Unscrew the round plastic retainer around the main headlight bulb.  Mine was broken and slid right out.  You can now slide the headlight unit out of the car
Headlight removed showing wiring harness

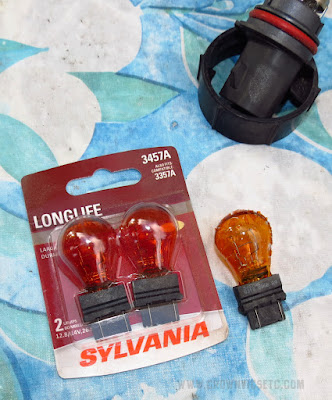
STEP FOUR:  Replace any bulbs you want to update.  As you can see, my "blinkas" were nasty looking, so I swapped in new ones.  I also had a spare retaining ring from the used headlight to replace my broken original

Comparison of original, 15 year old headlight with NOS replacement.  Notice the positioning pins are also the adjustments to align the headlights once they are on the car

NOW just reverse the process!  I matched the alignment pins to the old ones, assuming that the lighting would then match.  I was wrong... Use either a small socket or plyers, etc to properly align them.  Not sure how?  Here are some links to help you out:


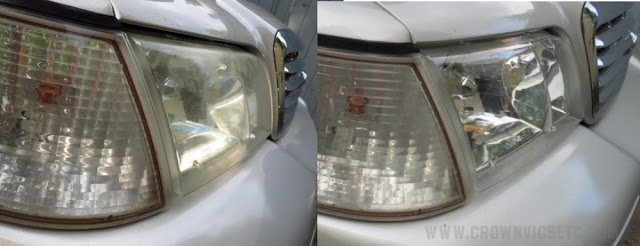
Before... after...

Saturday, April 11, 2020

HOW TO Change a Cabin Filter in a 2016 Ford Explorer / Police Interceptor Utility

The following is a pictorial guide to changing the cabin filter in a 2016 Ford Police Interceptor Utility, aka Explorer.  From what I have seen, this procedure SHOULD be the same for police and civilian models up to the 2019 model year.

(NOTE: things didn't go quite as planned, so I don't have as many photos to share as I should)

This is the filter I picked up at the dealer, Motorcraft FP-68.  It wasn't cheap... Not sure why it cost more this time than the one I installed into the Sedan!

You will need to semi-remove the glove box door for easier access to the old filter.  Remove everything from the glove box FIRST!  That's right, all the sugar packets and napkins from Dunkin Donuts, etc.  

There is an ELASTIC TETHER that slides into a hole on the right side of the glove box door.  It helps the door from opening too far.  Slide that off.

At the top of the glove box opening, there are TWO PLASTIC TABS THAT POINT DOWNWARD.  They also help to retain the door when it is open.  I pushed them backward instead of forward so as not to break them off, but basically you need to get them out of the way of the glove box door so it will open all the way.

Now, I did NOT take the glove box door off to install the filter.  You MIGHT want to, though, as just as I thought I was done and happy, the door somehow got bumped and part of the hinge popped off.  I'll get into that debacle later...

This is what you see when you look into the glove box opening.  It is just like in the Taurus.  Basically there is a little cover, or "trap door", if you will, that has two latches and two tabs.  Undo the latches, and slide the cover down. 

This is what the cover looks like (front & back), with the tabs and latches where you can see them.

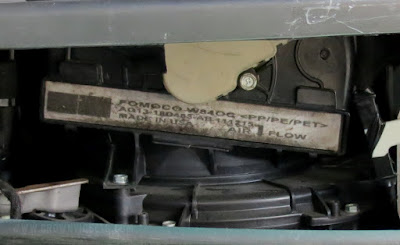
Here's the old filter still in place.  You may need a small screwdriver to help nudge it out a bit so you can get a better grip, then just slide it out.

We don't know if the filter had ever been changed, but it sure needed to be!

The new filter in place.  I added the date and mileage for future reference.

All you need to do now is reinstall the little filter cover, reattach the elastic tether to the side of the glove box door, and close it.

NOW, if you find yourself needing to remove OR reinstall the door, you need to know that there are two white plastic pins which actually come out.  We didn't know that, so when one side of the door popped off the pin, we didn't know how to reattach it.  A peek at the 'net resulted in the realization that one of the two plastic pins was not installed properly.  It was basically jammed into the wrong position.

After much car-repair-Yoga, temper flaring and use of large tools, I got both pins out.  We then put the cover in place, latched it, and slid the pins into place the way they are supposed to be installed... minus the fact we still need to lock them in.  In the photo below, you can see one and how it is slightly off-kilter.  But you get the idea.


This is a shot of an Explorer in a junk yard.  Someone had broken off the glove box door.  You can see the two white plastic pins which act as pivots.  The door is NOT SUPPOSED TO PRESS ONTO THOSE PINS!  Remember that if you find your door has popped off BUT the corresponding attachment hasn't broken off and flown off into oblivion...

And there you have it... your Interceptor will now smell like a daisy!!

(... well... a little better than before, anyhow...)

Thursday, March 14, 2019

HOW TO Change a Cabin Filter in a 2013 Ford Taurus / Police Interceptor Sedan

The following is a pictorial guide to changing the cabin filter in a 2013 Ford Police Interceptor Sedan, aka Taurus.  From what I have seen, this procedure SHOULD be the same for police and civilian models up to the 2019 model year.

First, get yourself a brand spankin' new filter.  We went with a Motorcraft FP-68 (AE9Z-19N619-A).

You will need to remove the glove box for easier access to the old filter.  Basically, you squeeze the sides of the box so that it opens all the way... then it falls out and everything falls onto the floor, which is why you will remove everything from the glove box FIRST!

Prior to starting this project, I watched some videos online so I would know exactly where to look for the filter.  So when I stuck my head under the dash I started to worry, because I didn't see ANYTHING that looked like the slot where the filter lives.  I kept following the vent ducts and didn't see a darn thing... Then I got mad and looked straight forward, and THERE IT WAS.

Basically there is a little cover, or "trap door", if you will, that has two latches and two tabs.  Undo the latches, and slide the cover down.  Now you will see the nasty old filter staring at you.  Slide it out and marvel at the nastiness!

As you can see, the cabin filter DOES actually DO something!  This vehicle started life 130,940 miles ago as a police cruiser in New Hampshire, which may explain all of the pine needles and dried leaf bits...

I wrote the mileage and date onto the new filter, just to be anal...

 
Make sure there's no leftover nastiness in the air-box, and install the new filter.

Now you can reinstall the glove box.  This means you can reorganize all of the old registrations, inspection receipts, and sugar packets.  NOTE that the left side of the glove box has some sort of plastic limiter which fell apart when I tried to reinstall the box.  One end has a tab that slides into a slot on the box.  This part connects to a second part with an odd elastic fitting.  I think I got everything back together correctly.

Tuesday, September 17, 2013

UPDATE: Chitchatter... Part 2

Car is back in the driveway.  Taxi Guy drained the transmission and torque convertor, then added 12 quarts of MerconV fluid.  He drove it around, then added a 13th quart.  I didn't have time to hit the highway on the way home, so I don't know if this sloved the chatter issue yet.  Will know within a couple of days...

As a side note, Vic now has 138,389 miles on the odometer. 

Friday, June 7, 2013

137,080: Oil & Front Brakes

 Vic got a much needed oil change at 137,070 with Mobil 1 synthetic oil and filter, and yesterday we put on front brake pads.  I say "we", but Todd always ends up doing the work!  My job seems to be calming him down and fetching tools.
I will have to pay attention to things as I drive the car, though, as one of the two pistons in the driver side caliper seemed to be almost seized.  The two on the passenger side were both a little hard to compress.  Not surprising, given the age of the car and the salt it has seen.

This time, I decided to go with a heavy duty pad by Wagner.  I learned something, too.  I was wondering what the groove in the new pads were for.  Apparently, they are like the wear bars on tires.  When the groove is gone, you need pads.  Supposedly it also helps dissipate water.

Sunday, May 19, 2013

UPDATE: Snow Tires Off

May 10th saw Vic's snow tires come off, and alloys with Goodyear RS-A's go on.  The spring ritual resulted in the revelation that I now need front brake pads.  Those got ordered today.  The day also included starting up Todd's '04 Mustang after it's winter slumber, getting an inspection sticker for it, and the mass murder of a huge flock of what looked like winged ants that had infested his garage.  As of this second, Vic is outside with a car-cover on, due to trees dumping "propellers" and general shmoo all over the place.