Welcome to the Crown Vics ETC blog!

On April 6, 2000, I purchased a 1998 Ford Crown Victoria LX HPP with 23,490 miles. I decided to start a little website for it featuring a running log of my experiences with the car. Vic 1.0 was retired in 2015 due to rust and electrical issues. Vic 2.0 was a 2006 P71 in Blue Pearl that belonged to my boyfriend. It was a Ford demo and never saw actual police use. It was damaged in September of 2018 with well over 186,000 miles. It was replaced by Vic 3.0 in October 2018, a 2008 P71 in Silver Birch with 120,971 miles. To read posts prior to 2010, click a link at right, or go to Crown Vics, ETC.

Showing posts with label remove. Show all posts

Sunday, September 17, 2023

HOW TO Change Crown Victoria Headlights

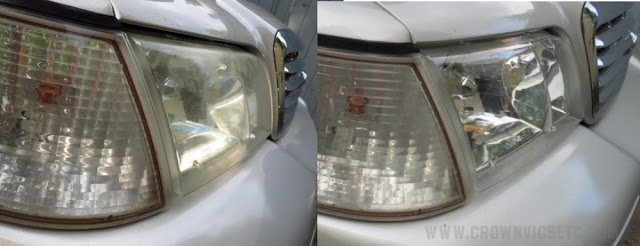
I am way behind with updates, so to catch up a bit, here's a quick rundown of how to swap your crummy, cloudy old headlights with nice, clear, shiny new ones.  A while back, I had scored a brand new original Ford and one super nice used example, and last year decided to install them and stop worrying that I'd be inviting some sort of smash-up simply by them being there (would be my luck, just like every single time I get brand new tires, I get nails and screws stuck in them!).

STEP ONE:  Open the hood, and remove the black plastic filler panel/radiator cover

STEP TWO:  Take a tool that you are comfortable with and slide these two retaining brackets UP to free the headlight


STEP THREE:  Unscrew the round plastic retainer around the main headlight bulb.  Mine was broken and slid right out.  You can now slide the headlight unit out of the car
Headlight removed showing wiring harness

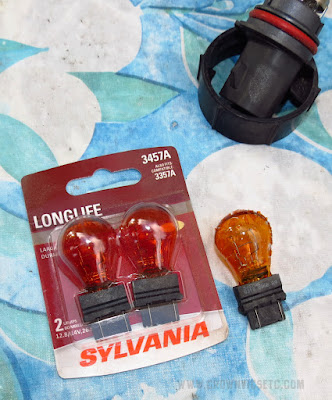
STEP FOUR:  Replace any bulbs you want to update.  As you can see, my "blinkas" were nasty looking, so I swapped in new ones.  I also had a spare retaining ring from the used headlight to replace my broken original

Comparison of original, 15 year old headlight with NOS replacement.  Notice the positioning pins are also the adjustments to align the headlights once they are on the car

NOW just reverse the process!  I matched the alignment pins to the old ones, assuming that the lighting would then match.  I was wrong... Use either a small socket or plyers, etc to properly align them.  Not sure how?  Here are some links to help you out:


Before... after...

Saturday, April 11, 2020

HOW TO Change a Cabin Filter in a 2016 Ford Explorer / Police Interceptor Utility

The following is a pictorial guide to changing the cabin filter in a 2016 Ford Police Interceptor Utility, aka Explorer.  From what I have seen, this procedure SHOULD be the same for police and civilian models up to the 2019 model year.

(NOTE: things didn't go quite as planned, so I don't have as many photos to share as I should)

This is the filter I picked up at the dealer, Motorcraft FP-68.  It wasn't cheap... Not sure why it cost more this time than the one I installed into the Sedan!

You will need to semi-remove the glove box door for easier access to the old filter.  Remove everything from the glove box FIRST!  That's right, all the sugar packets and napkins from Dunkin Donuts, etc.  

There is an ELASTIC TETHER that slides into a hole on the right side of the glove box door.  It helps the door from opening too far.  Slide that off.

At the top of the glove box opening, there are TWO PLASTIC TABS THAT POINT DOWNWARD.  They also help to retain the door when it is open.  I pushed them backward instead of forward so as not to break them off, but basically you need to get them out of the way of the glove box door so it will open all the way.

Now, I did NOT take the glove box door off to install the filter.  You MIGHT want to, though, as just as I thought I was done and happy, the door somehow got bumped and part of the hinge popped off.  I'll get into that debacle later...

This is what you see when you look into the glove box opening.  It is just like in the Taurus.  Basically there is a little cover, or "trap door", if you will, that has two latches and two tabs.  Undo the latches, and slide the cover down. 

This is what the cover looks like (front & back), with the tabs and latches where you can see them.

Here's the old filter still in place.  You may need a small screwdriver to help nudge it out a bit so you can get a better grip, then just slide it out.

We don't know if the filter had ever been changed, but it sure needed to be!

The new filter in place.  I added the date and mileage for future reference.

All you need to do now is reinstall the little filter cover, reattach the elastic tether to the side of the glove box door, and close it.

NOW, if you find yourself needing to remove OR reinstall the door, you need to know that there are two white plastic pins which actually come out.  We didn't know that, so when one side of the door popped off the pin, we didn't know how to reattach it.  A peek at the 'net resulted in the realization that one of the two plastic pins was not installed properly.  It was basically jammed into the wrong position.

After much car-repair-Yoga, temper flaring and use of large tools, I got both pins out.  We then put the cover in place, latched it, and slid the pins into place the way they are supposed to be installed... minus the fact we still need to lock them in.  In the photo below, you can see one and how it is slightly off-kilter.  But you get the idea.


This is a shot of an Explorer in a junk yard.  Someone had broken off the glove box door.  You can see the two white plastic pins which act as pivots.  The door is NOT SUPPOSED TO PRESS ONTO THOSE PINS!  Remember that if you find your door has popped off BUT the corresponding attachment hasn't broken off and flown off into oblivion...

And there you have it... your Interceptor will now smell like a daisy!!

(... well... a little better than before, anyhow...)

Thursday, August 31, 2017

Hey... nice rack!!

Vic 2.0 was THE most reliable Vic Mystery Mechanic (aka: Todd) ever owned.  While he owned it, he had one air conditioning part replaced, and one windshield wiper motor.  But the wiper motor was his fault (he always says not to leave your wipers on when you park for the night and there's a snow storm!).

So when on 8/28 I started the car to do a little work over at Belmont Seat Cover, and noticed the wiper motor sounded awful and didn't have much "ooomph", I started thinking back to the headache I had with motors in Vic 1.0.  Those past experiences made me start pondering how I was going to pay for A) a new Motorcraft motor B) a crappy rebuilt motor.  Then I started pondering the option of trying a used one.

Long story short, I spent some (messy) time at a local junk yard and removed a motor from a 2011 Massachusetts State PD cruiser.  I decided to leave it attached to the rack, and also thought it may be a good idea to bring the trim, hoses, weather strip, and wiper arms with me up to the check-out guys.  I had received a quote ahead of time for just the motor if I took it out of the car myself.  For the SAME PRICE, I got the whole setup!

This morning I decided to reverse the process and install the new (used) rack into Vic 2.0.  I started at about 11:45AM, and finished at about 3:45PM.  I decided to work slowly and take a lunch break, which slowed things down (along with stopping to feed the local squirrels and chipmunks!).

Other delays came from trying to remove the wiper arms (and HOW am I supposed to fit a screwdriver there??) a few times, and trying to remove a rusted on bolt on the metal bracket that attaches to the bottom rack bucket.  I never did get the nut off, but I did manage to "remove some metal" from it...

And so now Vic 2.0 has a 2011 wiper motor/rack/trim/weather-strip setup!  It also now has that super annoying "extra wipe" function, which I have NEVER understood.  It should make for a lot of yelling during the winter months, as I am super-wicked-picky about having a clear windshield...

One thing I learned this time that I didn't when I changed the motor in Vic 1.0, is that there is a little "flapper" by the motor that seems to allow water, etc OUT of the rack area, but doesn't allow critters IN.  Seeing as the 2011 had a mouse nest inside that area, I'm not so sure it works that well.  BUT, when I looked at the flapper in MY car, the whole area was clogged full of "shmoo".  I am starting to wonder if this has been a factor in the "What is That Musty Smell Coming From?" saga.

OH, that reminds me, I also squished some Permatex under the bottom lip of the windshield in effort to try and stop the Mystery Leak.  Of course, it was purchased around 2004, and I didn't have enough in the tube.  Also, nitrile gloves aren't tough enough to keep that hazmat off your fingers...

So, long story long, I am all set for winter, providing a 6 year old motor lasts longer than Vic 2.0's replacement one did.