Welcome to the Crown Vics ETC blog!

On April 6, 2000, I purchased a 1998 Ford Crown Victoria LX HPP with 23,490 miles. I decided to start a little website for it featuring a running log of my experiences with the car. Vic 1.0 was retired in 2015 due to rust and electrical issues. Vic 2.0 was a 2006 P71 in Blue Pearl that belonged to my boyfriend. It was a Ford demo and never saw actual police use. It was damaged in September of 2018 with well over 186,000 miles. It was replaced by Vic 3.0 in October 2018, a 2008 P71 in Silver Birch with 120,971 miles. To read posts prior to 2010, click a link at right, or go to Crown Vics, ETC.

Showing posts with label replace. Show all posts

Sunday, September 17, 2023

HOW TO Change a Crown Victoria Grille

SO after installing nice new headlights in Vic 3.0, I decided to bite the bullet and also install the NOS grille I had been sitting on for MANY years.  

This is a simple install.  All you need to do is remove the black plastic filler panel/radiator cover, then use a socket (I forgot to note the size for you, I THINK they are 7/16") and remove the retaining nuts all around the back of the grille.  Swap grilles, and put the nuts back... simple!  But don't overtighten them... don't want to snap the posts!

Now is a good time to touch up the paint around the grille... you KNOW you need to!

Old on bottom... note the corrosion on the chrome

Looks like a new car!  Now that license plate holder needs to be changed...


Monday, April 25, 2022

HOW TO... Replacing a Police Dome Light After 14 Years

A familiar accessory to anyone who has been around a police car is the snazzy dome light used in place of the vehicle's stock light.  It is known by many names... sun, ticket light, cop dome light, work light, etc.  The latest ones are LED and have both red and white lights.  But Vic 3.0 has the old clear-bulb version.  Wellp, somehow a crack had developed in the light's white plastic cover.   Earlier this month, I tried to push the crack in a bit, to make it look better, and instead I ended up with an actual hole.

Such a flaw is not tolerable.

So online I went, expecting to find tons of those plastic covers on Ebay.  I was surprised NOT to find many at all!  A few listings were what looked like cheap bulk lots.  I did manage to find a seller with NOS GM-bagged ones.  So they got my money, and I got the part.

While trying to pry the old cover off, it basically disintegrated in my hand.  On went the new one, and now things look a bit nicer.  

If YOU need to replace your dome cover, do a search for either "Signal Stat 77-570" or GM part number 10160922.  More digging will probably turn up a Ford part number as well.  


Tuesday, January 18, 2022

HOW TO Replace Crown Victoria Hood Struts

Last winter, I made a mental note that Vic 3.0 needed its hood struts replaced, as the hood wouldn't stay open, especially on really cold days.  Well, that mental note was forgotten until a year later when temps again started to go down.  I finally ordered new struts from Rock Auto and installed them in December, just before my entire family got COVID... (not a fun experience...)

If you have never replaced these struts on a Crown Vic, it is really pretty simple.  You will need something like a thin flat screwdriver (some sort of hook tool would be even better) and maybe a hammer.  

The struts attach to posts on the car via a type of spring-clip.  To remove the old struts, put the screwdriver (or hook tool) under the metal clip.  Pop it off the top and bottom posts.  To be safe, you may want to place something like a wood board against the hood to prop it open.  Do NOT use your head... 

You can now pry the old strut off the mounting posts.  Take the new strut and LOOSEN the spring clips.  DO NOT REMOVE THEM!  I accidentally popped one off and it took extra tools and anger to get the thing back on.  All you should do is LOOSEN them so that you can push the strut onto the proper post.

Make sure the strut is firmly pushed onto the posts, then push those clips down against the strut.  In other words, re-seat the clips.  The strut should now be firmly attached to the car, and your hood will no longer slam down onto your noggen.

I noticed that the original struts were made by the same people who made the replacements, Stabilus.  I like to use OEM parts when I can afford them, so I was happy about it.

The correct Stabilus part number is (T)SG404024.


Monday, December 9, 2019

130,000 Mile Update: Wipe Those Tears Away...

All through November, Vic 3.0's wipers were acting strange.  They would switch on and off... all on their own!  Sometimes, just the fluid would start squirting, usually as I was driving into the sun.  I figured it was the actual wiper control (part of the turn signal stalk).  But our mechanic, "Taxi Guy", said it was the wiper motor itself.  So first we got hold of a used multi-function wiper/turn signal unit.  A few days later, things got much worse...

While driving along, the wipers once again would go on and off all on their own.  Sometimes for a short time, sometimes long enough that I pulled over to see if they would shut off if I re-started the car.  Long story short, I ended up driving about 20 miles with my brand new Bosch wipers wiping my dry, brand new windshield.  I wasn't happy...

The next day, we got a used wiper motor/rack and I planned on doing the install myself.  After all, I had done it with Vic 1.0 & 2.0, so why not 3.0 as well? 

Curious about what it takes to swap the unit out?  Read on...

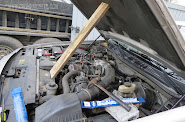
The first thing to do is remove the two wiper arms.  This is either a pain in the backside, or no big deal, depending on how picky you are about the paint finish of the arms and the edge of your hood.  You need to raise the arms until you can pry up the release "loop".  Then let the arm down.  It should lay off the glass.  That means you can now gently lift off the arm. 


Now, we need to remove the wiper motor/rack unit:

1) remove the weather seal.  That is simple.

2) remove the two black plastic pins that are located on the corners of the cowl trim/cover.


3) remove Phillips screws from the cover.

4) remove four clips that hold the cover to the assembly "bucket".


5) you can now remove the cowl trim, and see all of the "organic matter" that has built up through the years!


6) use a socket to remove the bolts that hold down the wiper assembly "bucket".

7) there is a part connected to a black metal bracket, which is attached to the "bucket" with two nuts.  This is the EVAP Canister Purge Valve.  Those nuts often rust solid, and some people just break the bracket off.  BUT, there is a very simple way to get around this... press the plastic tab on the purge valve and slide it off the bracket!  It should slide easily, but if not, just use a little WD40.


8) you can now begin to remove the bucket assembly.  You need to disconnect the motor connector and the wiper fluid hoses, which press into little plastic holders molded into the part.  The ends simply press onto the sprayer nozzles.  There may also be a wire-loom or two to remove.


At this point, you can either remove your motor or do what I did, which is go with the whole motor/bucket unit.  Either way, I highly suggest that you make sure the "drainy flappy trap door thing" is clean when you put the new bucket into the car (see photo). 


From this point, you simply reverse the above steps.  The entire job took me two hours, though I was using only hand tools, and spent extra time cleaning up the replacement parts.  I also stopped to observe a baby chipmunk who was stocking up on birdseed... it was the latest in the season I had ever seen a chippy out-and-about.

This is what your wiper motor looks like
Old "bucket", old cowl trim, replacement cowl trim all cleaned up
Replacement motor/rack installed and almost ready to go!
A 11/29/19 chipmunk!


Sunday, July 22, 2018

Swapping Rear Seats in a 2013 Ford Police Interceptor Sedan

This post is for anyone wondering what the rear seat area of a 2013 Police Interceptor Sedan looks like!

My boyfriend started out by removing the bottom seat cushion to look for a missing seat belt latch.  A while ago, he bought a totaled cruiser for parts, including a fabric rear seat setup to replace the vinyl setup his car came with from the dealer.  So he decided to finally put the fabric seats in while he had the chance.

Interestingly, I noticed that the vinyl seats that were in the car were dated 3/2/15, making them newer than the car's build date of February 2012.  The fabric seats from the parts car were dated 7/24/13. 

Rear Seat Release Latch
Seat bottom latch
Rear Seat Release Latch
Seat back latch
In case you were wondering, the bottom cushions latch into two plastic parts on the floor that have a little release lever.  The backs have two bolts on each side to remove (13mm & 15mm) on the corners.  Then you need to somehow find the two red fabric tethers that release the upper latches, allowing the cushion to be removed.  Have fun with that...

You now have a good look at the structure that helps make these cars safe.

Once the seats were out, it lead to the removal of the center console base so he could put wiring in place for a scanner head unit, to be installed later.  Word of advice when removing/installing the metal parts:  find a socket that is magnetic!  Also, keep track of which bolts came from where...

Once the wires were firmly in place under the metal console, attention was turned to under the hood, where the differences between the Taurus and Crown Victoria became evident.  You can hide a small child under the hood of a Crown Vic.  In the Taurus, figuring out how/where to snake wiring will make you stare and ponder for about a week.  The wiring project was left for a later date...

Ford Police Interceptor Sedan Brace
Here you can see how far the trunk floor extends into the passenger compartment
Ford Police Interceptor Sedan Brace
Note the date written on the metal brace "2/15/13"
Ford Police Interceptor Sedan Seat Cushion
Foam of the bottom cushion
Ford Police Interceptor Sedan Seat Cushion
The vinyl seat back that was in the car...
Ford Police Interceptor Sedan Seat Cushion
... and the cloth one installed.  Looks like it needs a clean!

Monday, May 28, 2018

SHOCKING! Front End Edition 2018

Wellp, after 12 years and 184,944 miles, the front shocks in Vic 2.0 were finally replaced.  A while ago I noticed a stain appearing on the driveway under the front passenger side of the car.  Then I noticed some odd handling characteristics.  Things finally got to the point I had to decide if I should replace the shocks ONLY, or the whole spring/shock unit... which I think is a strut.

After driving 1.0 for 15 years, I forgot that the front end of 2.0 is totally different.  In 1.0, you could easily replace the shock alone.  But after searching for new shocks online, and looking at my Ford shop manual, I came to the realization that no matter what, you need to take the spring and shock out TOGETHER, because to replace the shock you need to use a spring compressor.

SO, go with just new shocks to save money, but pay for more labor?  Pay more for parts, but for less labor?  I asked Taxi Guy and he said "get the complete units if you can", which I did.  The last 2 correct Motorcrafts that Rock Auto had in stock were shipped to me and the job was done on 5/28/18.

The maiden voyage with the upgrades wasn't what I expected.  The rest of the suspension was still worn, after all.  And I had to remind myself that this wasn't Ma's 1999 Town Car!  New springs and shocks on a police package car does not mean a "Cloud-like Ride"!  But I did notice improvements while banging over local potholes.  It was on the highway that I noticed the improvement more.

Bridge expansion joints are much better now.  And it seems that high-speed turns are better as well.  In fact, and I didn't tell you this, I managed to out-accelerate and out-drive a rather new Mercedes SUV in tight traffic.  He was attempting to make some stupid, aggressive moves and I sorta ruined that for him...................

While taking the photos for this post, I was surprised to see how clean things look under the front of 2.0.  I have had far fewer glances under this car than 1.0.  I only wish the body was as solid...

Saturday, September 16, 2017

SHOCKING!

On Sept 2nd, we FINALLY installed two new rear shocks.  Vic 2.0 has been driving like an old Cadillac... a PERFORMANCE one, but still, NOT like a P71.

I was surprised to see there are no longer lots of quality replacement shocks to choose from anymore. I decided to go with MOTORCRAFT #ASH12277 from RockAuto.com.  If you go with these, keep in mind you need to also order MOTORCRAFT #6W7Z18A161AA, the top bushing/nut, unless you are OK with using your old ones.

One of the original shocks was "eh", the other was doing absolutely NOTHING.  That is the one that had a little stain under it in the driveway.  All the oil must have leaked out long ago.  Vic rides a lot better now.  I'd do the fronts as well if I had the extra cash to spend.  But I don't, thanks to the next update...

11+ years old with 179,205 miles on it...


Thursday, August 31, 2017

Hey... nice rack!!

Vic 2.0 was THE most reliable Vic Mystery Mechanic (aka: Todd) ever owned.  While he owned it, he had one air conditioning part replaced, and one windshield wiper motor.  But the wiper motor was his fault (he always says not to leave your wipers on when you park for the night and there's a snow storm!).

So when on 8/28 I started the car to do a little work over at Belmont Seat Cover, and noticed the wiper motor sounded awful and didn't have much "ooomph", I started thinking back to the headache I had with motors in Vic 1.0.  Those past experiences made me start pondering how I was going to pay for A) a new Motorcraft motor B) a crappy rebuilt motor.  Then I started pondering the option of trying a used one.

Long story short, I spent some (messy) time at a local junk yard and removed a motor from a 2011 Massachusetts State PD cruiser.  I decided to leave it attached to the rack, and also thought it may be a good idea to bring the trim, hoses, weather strip, and wiper arms with me up to the check-out guys.  I had received a quote ahead of time for just the motor if I took it out of the car myself.  For the SAME PRICE, I got the whole setup!

This morning I decided to reverse the process and install the new (used) rack into Vic 2.0.  I started at about 11:45AM, and finished at about 3:45PM.  I decided to work slowly and take a lunch break, which slowed things down (along with stopping to feed the local squirrels and chipmunks!).

Other delays came from trying to remove the wiper arms (and HOW am I supposed to fit a screwdriver there??) a few times, and trying to remove a rusted on bolt on the metal bracket that attaches to the bottom rack bucket.  I never did get the nut off, but I did manage to "remove some metal" from it...

And so now Vic 2.0 has a 2011 wiper motor/rack/trim/weather-strip setup!  It also now has that super annoying "extra wipe" function, which I have NEVER understood.  It should make for a lot of yelling during the winter months, as I am super-wicked-picky about having a clear windshield...

One thing I learned this time that I didn't when I changed the motor in Vic 1.0, is that there is a little "flapper" by the motor that seems to allow water, etc OUT of the rack area, but doesn't allow critters IN.  Seeing as the 2011 had a mouse nest inside that area, I'm not so sure it works that well.  BUT, when I looked at the flapper in MY car, the whole area was clogged full of "shmoo".  I am starting to wonder if this has been a factor in the "What is That Musty Smell Coming From?" saga.

OH, that reminds me, I also squished some Permatex under the bottom lip of the windshield in effort to try and stop the Mystery Leak.  Of course, it was purchased around 2004, and I didn't have enough in the tube.  Also, nitrile gloves aren't tough enough to keep that hazmat off your fingers...

So, long story long, I am all set for winter, providing a 6 year old motor lasts longer than Vic 2.0's replacement one did.

Friday, May 12, 2017

Vic 2.0 Gets Intake Transplant PART 2

Just got Vic 2.0 back.  Taxi Guy changed all the spark plugs and a few coil pack bits as an extra precaution.  To christen the new intake, I had to sit in traffic for over a half hour just to go about 4-5 miles... (sigh)...

Tuesday, July 19, 2016

Floppy Sun Visor FIXED!!

Vic 2.0 is feeling a little happier now.  Last week I FINALLY just said "EH!" and went out to the driveway in the summer heat and cleaned the inside real good.  This included cleaning all the coffee off the cupholder.

The other day the windshield was replaced due to a small stone chip that grew into a bonafide crack. 

The next day, I installed my brand spankin' new sunvisor and retainer!

Since I help out at a local auto upholstery shop, I knew that it is easy to make a visor install a little confusing.  That comes from moving the pivot around too much.  All I needed was a 20mm torx and a small ratchet.  The only part of the install that was a hassle was the retainer hook.  For some reason, the locator pin on the back was in a totally different location.  I couldn't get it to push through the headliner, so I just broke it off.

I can now drive safely, free from blinding sun and a broken visor that wanted to make me drive off the road!

Double sided Velcro was all I had to keep the broken visor up after the retainer hook broke

The broken retainer clip, broken in a fit of anger by myself...
Part # for Medium Stone Gray retainer
Part # for the visor
The original part is on the left, note the different locator pin on the new part at right
Torx and ratchet
This is what the mounting location looks like
You can see how moving the pivot around too much can confuse installation for a short time

ALL DONE!  YAY!