Welcome to the Crown Vics ETC blog!

On April 6, 2000, I purchased a 1998 Ford Crown Victoria LX HPP with 23,490 miles. I decided to start a little website for it featuring a running log of my experiences with the car. Vic 1.0 was retired in 2015 due to rust and electrical issues. Vic 2.0 was a 2006 P71 in Blue Pearl that belonged to my boyfriend. It was a Ford demo and never saw actual police use. It was damaged in September of 2018 with well over 186,000 miles. It was replaced by Vic 3.0 in October 2018, a 2008 P71 in Silver Birch with 120,971 miles. To read posts prior to 2010, click a link at right, or go to Crown Vics, ETC.

Sunday, September 17, 2023

HOW TO Change a Crown Victoria Grille

SO after installing nice new headlights in Vic 3.0, I decided to bite the bullet and also install the NOS grille I had been sitting on for MANY years.  

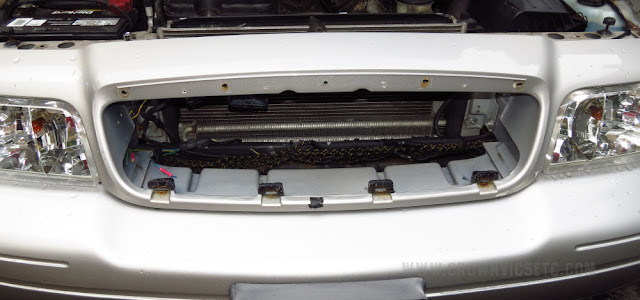
This is a simple install.  All you need to do is remove the black plastic filler panel/radiator cover, then use a socket (I forgot to note the size for you, I THINK they are 7/16") and remove the retaining nuts all around the back of the grille.  Swap grilles, and put the nuts back... simple!  But don't overtighten them... don't want to snap the posts!

Now is a good time to touch up the paint around the grille... you KNOW you need to!

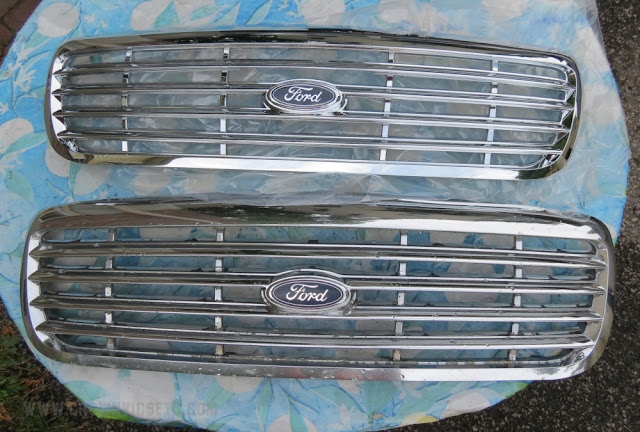
Old on bottom... note the corrosion on the chrome

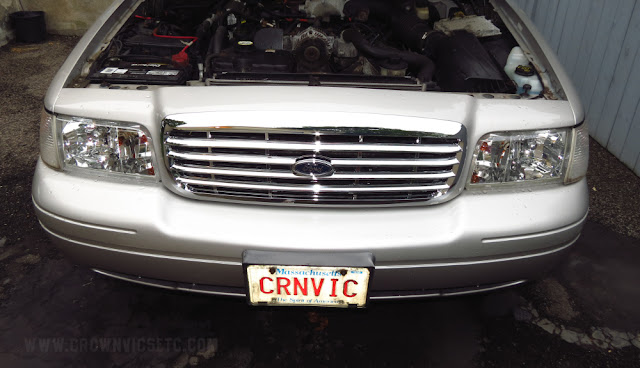
Looks like a new car!  Now that license plate holder needs to be changed...


HOW TO Change Crown Victoria Headlights

I am way behind with updates, so to catch up a bit, here's a quick rundown of how to swap your crummy, cloudy old headlights with nice, clear, shiny new ones.  A while back, I had scored a brand new original Ford and one super nice used example, and last year decided to install them and stop worrying that I'd be inviting some sort of smash-up simply by them being there (would be my luck, just like every single time I get brand new tires, I get nails and screws stuck in them!).

STEP ONE:  Open the hood, and remove the black plastic filler panel/radiator cover

STEP TWO:  Take a tool that you are comfortable with and slide these two retaining brackets UP to free the headlight


STEP THREE:  Unscrew the round plastic retainer around the main headlight bulb.  Mine was broken and slid right out.  You can now slide the headlight unit out of the car
Headlight removed showing wiring harness

STEP FOUR:  Replace any bulbs you want to update.  As you can see, my "blinkas" were nasty looking, so I swapped in new ones.  I also had a spare retaining ring from the used headlight to replace my broken original

Comparison of original, 15 year old headlight with NOS replacement.  Notice the positioning pins are also the adjustments to align the headlights once they are on the car

NOW just reverse the process!  I matched the alignment pins to the old ones, assuming that the lighting would then match.  I was wrong... Use either a small socket or plyers, etc to properly align them.  Not sure how?  Here are some links to help you out:


Before... after...

RETIRED: Dad's 2010 Mercury Grand Marquis

Dad's 2010 Grand Marquis went to a new home today, with a whopping 70,615 miles on it.  It went to a local man, so we may see it out and about!  Dad is now driving Mom's 2011 Crown Vic.  

12/21/11-7/14/22